【Electron】WebページにCSS/JS/HTMLを挿入する開発者向けアプリを作る
更新日:2026/03/27
WordPressの計算フォームの設置プラグインの作成依頼を受けることがあるのですが、相手先のテーマやカスタマイズ状況によっては設置後に画面が大きく乱れることがあります。
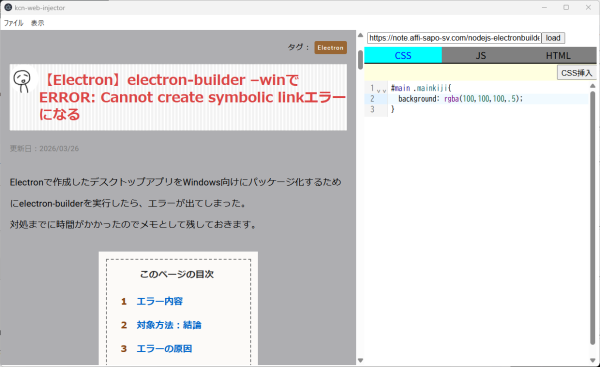
そこで、読み込んだWebページにCSSを挿入するアプリをElectronで作成しました。
JavaScriptとHTMLの挿入機能を合わせて導入しました。
個人的に使用することを目的としているのでソースのみ公開します。
ソース/ビルド
ソースファイルはGitHubにアップロードしてあります。
ダウウンロードは上記リンク先の 『Code』ボタン→Download Zip でおこないます。
解凍したらフォルダ内に移動して、次のコマンドを実行。
Windowsの場合
※管理者権限で実行
npm install
npm run build:win
Macは、
npm run build:mac
Linuxは、
npm run build:linux
でビルドを行いますが、こちらはテストしていません。
ビルドが終わったら、dist\win-unpacked\kcn-web-injector.exe が実行ファイルとして生成されているはずです。
なお今回作成したアプリは、入力したCSS/JS/HTMLが、そのままWebページに挿入されます。
不正なコードが実行される可能性がありますが、その可能性を含めて確認を行うのが目的だからです。
解説
ここに掲載したコードの一部は、解説用に修正を加えています。
実際のコードはGitHub上のコードを確認してください。
プロジェクトの作成
今回はelectron-viteを使って、開発環境をセットアップしていきます。
次のコマンドで、electron-viteプロジェクトを構築します。
npm create @quick-start/electron@latest
『npm create electron-vite』で環境構築できますが、こちらはViteのテンプレートです。
今回使用するelectron-viteとは異なるので注意しましょう。
コマンドを実行すると、質問されます。
今回は、次のように答えました。
? Project name: kcn-web-injector
? Select a framework: react
? Add TypeScript? : Yes
? Add Electron updater plugin? : No
? Enable Electron download mirror proxy? : No
インストールが終了するまで少し待ちます。
終了したら、作成されたプロジェクトのディレクトリに移動して、次のコマンドで依存モジュールをインストールします。
npm install
ファイル構成
kcn-web-injector
 ┣━ build
 ┃   ┣━ entitlements.mac.plist
 ┃   ┣━ icon.icns
 ┃   ┣━ icon.ico
 ┃   ┗━ icon.png
 ┣━ resources
 ┃   ┗━ icon.png
 ┣━ src
 ┃   ┣━ main
 ┃   ┃   ┣━ utils
 ┃   ┃   ┃   ┣━ dialog.ts
 ┃   ┃   ┃   ┣━ filter.ts
 ┃   ┃   ┃   ┣━ ipc.ts
 ┃   ┃   ┃   ┣━ menu-web.ts
 ┃   ┃   ┃   ┣━ menu.ts
 ┃   ┃   ┃   ┣━ resize.ts
 ┃   ┃   ┃   ┗━ setmenu.ts
 ┃   ┃   ┗━ index.ts
 ┃   ┣━ preload
 ┃   ┃   ┣━ utils
 ┃   ┃   ┃   ┣━ css_inject.ts
 ┃   ┃   ┃   ┗━ html_inject.ts
 ┃   ┃   ┣━ index-ui.d.ts
 ┃   ┃   ┣━ index-ui.ts
 ┃   ┃   ┣━ index-web.d.ts
 ┃   ┃   ┗━ index-web.ts
 ┃   ┗━ renderer
 ┃       ┣━ src
 ┃       ┃   ┣━ ui
 ┃       ┃   ┃   ┣━ assets
 ┃       ┃   ┃   ┃   ┗━ main.css
 ┃       ┃   ┃   ┣━ components
 ┃       ┃   ┃   ┃   ┣━ codemirror.tsx
 ┃       ┃   ┃   ┃   ┣━ csseditor.tsx
 ┃       ┃   ┃   ┃   ┣━ htmleditor.tsx
 ┃       ┃   ┃   ┃   ┣━ jseditor.tsx
 ┃       ┃   ┃   ┃   ┣━ loadpage.tsx
 ┃       ┃   ┃   ┃   ┗━ tabs.tsx
 ┃       ┃   ┃   ┣━ App.tsx
 ┃       ┃   ┃   ┗━ main.tsx
 ┃       ┃   ┗━ env.d.ts
 ┃       ┣━ index-ui.html
 ┃       ┗━ index-web.html
 ┣━ .editorconfig
 ┣━ .gitignore
 ┣━ .prettierignore
 ┣━ .prettierrc.yaml
 ┣━ electron-builder.yml
 ┣━ electron.vite.config.ts
 ┣━ eslint.config.mjs
 ┣━ jsconfig.json
 ┣━ package-lock.json
 ┣━ package.json
 ┣━ tsconfig.json
 ┣━ tsconfig.node.json
 ┗━ tsconfig.web.json
画面構成とビュー
ElectronのBrowserViewが非推奨になったので、今回はv30.0.0で正式版となったWebContentsViewで画面を構成します。
下図のように、Webページ表示用のWebContentsViewと、UI表示用のWebContentsViewをBaseWindow内に設置します。
┏━━ BaseWindow ━━━━━━━┓
┃                              ┃
┃┏━━━━━━━━┓┏━━━┓┃
┃┃ *1             ┃┃*2    ┃┃
┃┃                ┃┃      ┃┃
┃┃                ┃┃      ┃┃
┃┗━━━━━━━━┛┗━━━┛┃
┗━━━━━━━━━━━━━━━┛
青:WebContentsView
*1 : Webページ表示部
*2 : UI部
BaseWindow作成後に、各WebContentsViewを作成して、BaseWindowにWebContentsViewをセットします。
src/main/index.ts
 const win = new BaseWindow({
    width: windowWidth,
    height: windowHeight,
    ...(process.platform === 'linux' ? { icon } : {})
  })
  // Webページ表示用View
  const webView = new WebContentsView({
    webPreferences: {
      preload: join(__dirname, '../preload/index-web.js'),
      nodeIntegration: false,
      sandbox: true,
      contextIsolation: true,
      webviewTag: false
    }
  })
  // window.openとtarget="_blank"での読み込み無効化
  webView.webContents.setWindowOpenHandler(() => {
    errorDialog('ページ遷移をキャンセルしました')
    return { action: 'deny' }
  })
  // BaseWindowにWebContentsViewをセット
  win.contentView.addChildView(webView)

  //UI表示用View
  const uiView = new WebContentsView({
    webPreferences: {
      preload: join(__dirname, '../preload/index-ui.js'),
      nodeIntegration: false,
      sandbox: false,
      contextIsolation: true
    }
  })
  // BaseWindowにWebContentsViewをセット
  win.contentView.addChildView(uiView)
次にWebContentsViewをBaseWindowのサイズに合わせてサイズ調整します。
src/main/index.ts
  // ビュー表示位置設定
  const setBounds = (): void => {
    const { width, height } = win.getContentBounds()

    const w = Math.max(width - panelWidth - 5, 0)
    webView.setBounds({ x: 0, y: 0, width: w, height: height - 3 })
    uiView.setBounds({ x: w, y: 0, width: panelWidth, height: height - 3 })
  }

  setBounds()

  win.on('resize', () => {
    setBounds()
  })
WebContentsViewはBaseWindowが閉じても破棄されないので、手動で閉じます。
src/main/index.ts
  win.on('closed', () => {
    webView.webContents.close()
    uiView.webContents.close()
  })
最後にWebContentsViewにコンテンツを読み込ませます。
src/main/index.ts
  // ビューコンテンツロード
  if (is.dev && process.env['ELECTRON_RENDERER_URL']) {
    const path = process.env['ELECTRON_RENDERER_URL'] + '/'
    uiView.webContents.loadURL(path + 'index-ui.html')
    webView.webContents.loadURL(path + 'index-web.html')
  } else {
    const path = join(__dirname, '../renderer')
    uiView.webContents.loadFile(join(path, 'index-ui.html'))
    webView.webContents.loadFile(join(path, 'index-web.html'))
  }
開発時は開放されたポートからloadURL()を使って読み込みます。
本番環境では、loadFile()を使ってファイルを読み込みます。
electron.vite.config.ts
今回はWeb用とUI用のそれぞれに、preloadコードとレンダーHTMLを用意します。
それらがビルドされるように、electron.vite.config.tsを編集します。
electron.vite.config.ts
import { resolve } from 'path'
import { defineConfig } from 'electron-vite'
import react from '@vitejs/plugin-react'

export default defineConfig({
  main: {},
  preload: {
    build: {
      rollupOptions: {
        input: {
          'index-ui': resolve('src/preload/index-ui.ts'),
          'index-web': resolve('src/preload/index-web.ts')
        }
      }
    }
  },
  renderer: {
    build: {
      rollupOptions: {
        input: {
          'index-ui': resolve('src/renderer/index-ui.html'),
          'index-web': resolve('src/renderer/index-web.html')
        }
      }
    },
    plugins: [react()]
  }
})
UI部からWeb部への制御の流れ
今回はUI部からWeb部へ、次の流れで通信を行います。
- UI用preloadコード : window.uiapi.関数名を定義
- UI用HTML内のスクリプト: window.uiapi.関数名を呼び出し
- UI用preloadコード : 呼び出した関数内で ipcRenderer.invoke() を呼び出し
- main側コード: ipcMain.handle()で、UI用preloadコードからの通信を受ける
- main側コード: Web用のWebContentsViewのexecuteJavaScript()を呼び出しスクリプトを注入
UI用preloadコード
UI用preloadコードは、関数をオブジェクトにまとめ、contextBridge.exposeInMainWorld()でUI側に公開します。
公開した関数は、ipcRenderer.invoke()を呼び出して、main側にメッセージを送るだけです。
src/preload/index-ui.ts
import { contextBridge, ipcRenderer } from 'electron'

const api = {
  loadPage: (url: string): Promise<null | undefined> => ipcRenderer.invoke('loadPage', url),
  insertCss: (css: string): Promise<null | string> =>
    ipcRenderer.invoke('insertCss', css),
  insertJs: (js: string): Promise<null> => ipcRenderer.invoke('insertJs', js),
  insertHtml: (selector: string, html: string, position: string) =>
    ipcRenderer.invoke('insertHtml', selector, html, position)
}
// Use `contextBridge` APIs to expose Electron APIs to
// renderer only if context isolation is enabled, otherwise
// just add to the DOM global.
if (process.contextIsolated) {
  try {
    contextBridge.exposeInMainWorld('uiapi', api)
  } catch (error) {
    console.error(error)
  }
} else {
  // @ts-ignore (define in dts)
  window.uiapi = api
}

export type API = typeof api
今回はTypeScriptで記述しているので、window.uiapiの型をレンダー側に公開するために d.ts ファイルを作成します。
src/preload/index-ui.d.ts
import { API } from '@preload/index-web'

declare global {
  interface Window {
    uiapi: API
  }
}
tsconfig.web.jsonにfilesを追加して、d.ts ファイルを適用します。
tsconfig.web.json
{
  "extends": "@electron-toolkit/tsconfig/tsconfig.web.json",
  "include": [
    "src/renderer/src/env.d.ts",
    "src/renderer/src/**/*",
    "src/renderer/src/**/*.tsx",
  ],
 "files": ["src/preload/index-ui.d.ts","src/preload/index-web.d.ts"],
  "compilerOptions": {
    "composite": true,
    "jsx": "react-jsx",
    "outDir": "out",
  }
}
追加したら『src/preload/index-ui.d.tsに上書きできない。』という主旨のエラーが出ました。
ビルドの出力先がsrcと判断されているようなので、compilerOptions.outDirで出力先を明示してあります。
UI用HTML内のスクリプト
UI用HTML内のスクリプトは、Reactで作成しました。
今回作成した機能はいくつかありますが、ここではCSSの挿入について紹介します。
src/renderer/src/ui/components/csseditor.tsx
import { useMemo, useCallback, useRef } from 'react'
import CodeMirror from '@renderer/src/ui/components/codemirror'
import { css } from '@codemirror/lang-css'

function CssEditor(): React.JSX.Element {
  const extensions = useMemo(() => [css()], [])
  const onSubmit = useCallback(async (value: string) => {
    await window.uiapi.insertCss(value)
  }, [])

  return <CodeMirror extensions={extensions} onSubmit={onSubmit} title="CSS挿入" />
}

export default CssEditor
CodeMirrorコンポーネントに渡したonSubmit()関数が呼び出されたら、window.uiapi.insertCss()関数を呼び出しています。
CodeMirrorコンポーネントはcodemirrorをエディターとして配置して、ボタンが押されたらonSubmit()関数を呼び出すだけです。
src/renderer/src/ui/components/codemirror.tsx
import { useRef, useCallback } from 'react'
import ReactCodeMirror from '@uiw/react-codemirror'
import { Extension } from '@codemirror/state'
import { EditorView } from '@codemirror/view'
import { basicSetup } from 'codemirror'

type Props = {
  extensions?: Extension[]
  onSubmit?: null | ((value: string, title: string) => void)
  title?: string | string[]
}

function CodeMirror({
  extensions = [],
  onSubmit = null,
  title = '送信'
}: Props): React.JSX.Element {
  const viewRef = useRef<EditorView | null>(null)

  const onClick = useCallback(
    (e: React.MouseEvent<HTMLButtonElement>): void => {
      const title = e.currentTarget.dataset.title ?? ''
      const value = viewRef.current?.state.doc.toString() ?? ''
      onSubmit?.(value, title)
    },
    [onSubmit]
  )

  const titles = Array.isArray(title) ? title : [title]

  return (
    <>
      <div className="codemirror-button-wrap">
        {titles.map((t, i) => (
          <button
            data-title={t}
            key={`button_${i}`}
            className="codemirror-button"
            onClick={onClick}
          >
            {t}
          </button>
        ))}
      </div>
      <div className="codemirror-editor">
        <ReactCodeMirror
          value=""
          extensions={[basicSetup, ...extensions]}
          onCreateEditor={(view) => {
            viewRef.current = view
          }}
        />
      </div>
    </>
  )
}

export default CodeMirror
main側コード
main側コードは、ipcMain.handle()でUI側のメッセージを受け取ります。
次にWeb側のWebContentsViewのexecuteJavaScript()を呼び出しスクリプトを注入します。
src/main/index.ts
  const buildJsCode = (apiName: string, data: { [key: string]: string }): string => {
    const json = JSON.stringify(data)
    return `(data=>{window.webapi.${apiName}(data)})(JSON.parse(${JSON.stringify(json)}))`
  }
  // CSS挿入要求
  ipcMain.handle('insertCss', async (_, css: string) => {
    const code = buildJsCode('insertCss', { css })

    webView.webContents.executeJavaScript(code).catch((e) => {
      errorDialog(`CSS Insert Faild:${e}`)
      return null
    })
  })
executeJavaScript()は文字列を渡すので、オブジェクトをJSON.stringify()で文字列化しているのですが、2回実行しているのはオブジェクト中の文字列内にダブルコーテーションが含まれているケースを考慮しています。
Web側に渡したスクリプトは、window.webapi.insertCss()を呼び出します。
これはWeb側のpreloadで定義しています。
この関数を使用すると injected stylesheetとしてCSSが挿入されるのですが、挿入したCSSの優先度が低くなることがあるので、手動でbodyの最後に挿入しています。
Web側のapi呼び出し
Web側のapiは、UI側と同じようにcontextBridge.exposeInMainWorld()で公開します。
src/preload/index-web.ts
import { contextBridge } from 'electron'

const cssInject = (data: { css: string }): void => {
  const name = '___injected_style_1___'
  const css = data.css
  let styleTag = document.getElementById(name)
  if (!styleTag) {
    styleTag = document.createElement('style')
    styleTag.id = name
    document.body.appendChild(styleTag)
  }
  styleTag.textContent = css
}

const api = {
  insertCss: cssInject
}
// Use `contextBridge` APIs to expose Electron APIs to
// renderer only if context isolation is enabled, otherwise
// just add to the DOM global.
if (process.contextIsolated) {
  try {
    contextBridge.exposeInMainWorld('webapi', api)
  } catch (error) {
    console.error(error)
  }
} else {
  // @ts-ignore (define in dts)
  window.webapi = api
}

export type API = typeof api
更新日:2026/03/27
関連記事
スポンサーリンク
記事の内容について

こんにちはけーちゃんです。
説明するのって難しいですね。
「なんか言ってることおかしくない?」
たぶん、こんなご意見あると思います。
裏付けを取りながら記事を作成していますが、僕の勘違いだったり、そもそも情報源の内容が間違えていたりで、正確でないことが多いと思います。
そんなときは、ご意見もらえたら嬉しいです。
掲載コードについては事前に動作確認をしていますが、貼り付け後に体裁を整えるなどをした結果動作しないものになっていることがあります。
生暖かい視線でスルーするか、ご指摘ください。
ご意見、ご指摘はこちら。
https://note.affi-sapo-sv.com/info.php
このサイトは、リンクフリーです。大歓迎です。


