【WordPress】管理画面の複数の項目値を連想配列で一つにまとめて登録する方法
更新日:2024/02/27
WordPressの管理画面を自作するとき、複数の項目を一つの連想配列としてまとめる方法をお伝えします。
やりたいこと
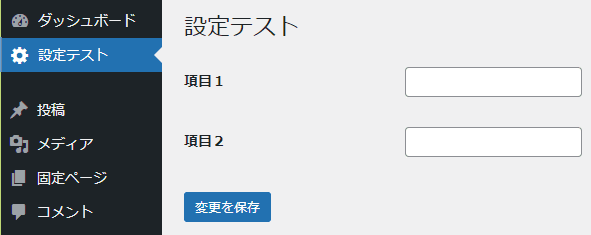
次のような管理画面を作成するケースを考えてみます。

管理画面の作り方は、次のページを読んでみてください。
この画面を作成するとき、register_setting()を項目の数だけ呼び出します。
register_setting( 'test-settings-group', 'my_test_item1' );
register_setting( 'test-settings-group', 'my_test_item2' );
さらに、画面のhtmlコード生成時にget_option()を項目の数だけ呼び出して、項目の値を取得します。
  $item1 = esc_attr(get_option('my_test_item1',''));
  $item2 = esc_attr(get_option('my_test_item2',''));
?>
  <tr><th scope="row" >項目1</th><td><input type="text" name="my_test_item1" value="<?= $item1 ?>"></td></tr>
  <tr><th scope="row" >項目2</th><td><input type="text" name="my_test_item2" value="<?= $item2 ?>"></td></tr>
<?php
(動作確認で作成したコードはこちら)
項目値を個別に使用するなら、この方法の方がいいかもしれません。
しかし関連値として同時に参照するなら、次のような連想配列として扱った方が効率がいいこともあります。
my_test_item {
    'item1' => 値
    'item2' => 値
}
この方法について、考えてみます。
項目を連想配列にまとめる
項目を連想配列にまとめるには、入力項目のname属性に次のように配列形式([])を使用します。
<input name="my_test_item[item1]" >
<input name="my_test_item[item2]" >
具体的には、まずregister_setting()でオプション名を登録します。
register_setting( 'test-settings-group', 'my_test_item' );
画面のhtmlコード生成時にget_option()で連想配列を取得して、入力タグを生成します。
  $item = array_replace_recursive(
      array( 'item1' => '' , 'item2' => '' ) ,
      get_option('my_test_item',array()));

  $item1 = esc_attr($item['item1']);
  $item2 = esc_attr($item['item2']);
?>
  <tr><th scope="row" >項目1</th><td><input type="text" name="my_test_item[item1]" value="<?= $item1 ?>"></td></tr>
  <tr><th scope="row" >項目2</th><td><input type="text" name="my_test_item[item2]" value="<?= $item2 ?>"></td></tr>
<?php
(動作確認で作成したコードはこちら)
連想配列のキーチェックなどを行う必要があります。
今回はarray_replace_recursive()でデフォルト値とマージしていますが、場合によってはisset()などで個々にチェックする必要があります。
複数のチェックボックスをまとめる
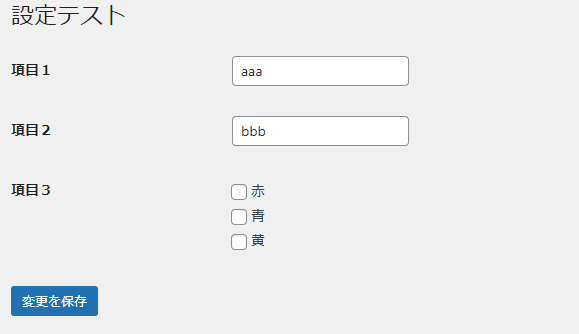
次は複数のチェックボックスを追加してみます。

連想配列のキーに'check'を追加して、ここにチェックボックスの値をセットしていきます。
my_test_item {
    'item1' => 値
    'item2' => 値
    'check' => 値
}
このとき、name属性の指定方法は2種類あります。
方法1
一つ目は、各チェックボックスに個別に名前を与えます。
<p><input type="checkbox" name="my_test_item[check][red]" value="1" >赤</p>
<p><input type="checkbox" name="my_test_item[check][blue]" value="1" >青</p>
<p><input type="checkbox" name="my_test_item[check][yellow]" value="1" >黄</p>
チェックボックスは、チェックされているもののみブラウザから送信されてきます。
そのため、青と黄がチェックされているときは、次のようになります。
my_test_item {
    'item1' => 値
    'item2' => 値
    'check' => { 'blue' => '1' , 'yellow' => '1' }
}
なお、全てチェックされていないときはcheckキーが存在しません。
(動作確認で作成したコードはこちら)
方法2
一つ目は、各チェックボックスに同じに名前を与えます。
<p><input type="checkbox" name="my_test_item[check][]" value="red" >赤</p>
<p><input type="checkbox" name="my_test_item[check][]" value="blue" >青</p>
<p><input type="checkbox" name="my_test_item[check][]" value="yellow" >黄</p>
name属性は、最後に空の[]を記述するのがポイントです。
また、value属性は個別の値を指定します。
これにより、チェックされた項目のvalue属性値が配列の要素としてブラウザから送信されてきます。
my_test_item {
    'item1' => 値
    'item2' => 値
    'check' => { 'blue' , 'yellow' }
}
こちらも、全てチェックされていないときはcheckキーが存在しません。
(動作確認で作成したコードはこちら)
コード例
今回の記事を作成するために作成したコードを掲載しておきます。
項目を個別に登録するバージョン
やりたいことの動作確認で作成したコードです。
add_action('admin_menu',
  function() {
    add_menu_page('設定テスト', '設定テスト', 'manage_options' , 'my_test_option'
    , 'echo_my_test_option','',3);
    add_action( 'admin_init', 'my_register_option' );
  });
function my_register_option() {
    // 項目の数だけ繰り返す
  register_setting( 'test-settings-group', 'my_test_item1' );
  register_setting( 'test-settings-group', 'my_test_item2' );
}
function echo_my_test_option() {
?>
  <div class="wrap">
    <h2>設定テスト</h2>
    <form method="post" action="options.php">
      <?php
        settings_fields( 'test-settings-group' );
        do_settings_sections( 'test-settings-group' );
      ?>
      <table class="form-table">
        <?php
          echo_my_test_option_item();
        ?>
      </table>
      <?php submit_button(); ?>
    </form>
  </div>
<?php
}
function echo_my_test_option_item() {
    // 全ての項目をget_option()で取り出す
  $item1 = esc_attr(get_option('my_test_item1',''));
  $item2 = esc_attr(get_option('my_test_item2',''));
?>
  <tr><th scope="row" >項目1</th><td><input type="text" name="my_test_item1" value="<?= $item1 ?>"></td></tr>
  <tr><th scope="row" >項目2</th><td><input type="text" name="my_test_item2" value="<?= $item2 ?>"></td></tr>
<?php
}
連想配列にまとめて登録するバージョン
項目を連想配列にまとめるの動作確認で作成したコードです。
<?php
add_action('admin_menu',
  function() {
    add_menu_page('設定テスト', '設定テスト', 'manage_options' , 'my_test_option'
    , 'echo_my_test_option','',3);
    add_action( 'admin_init', 'my_register_option' );
  });
function my_register_option() {
  register_setting( 'test-settings-group', 'my_test_item' );
}
function echo_my_test_option() {
?>
  <div class="wrap">
    <h2>設定テスト</h2>
    <form method="post" action="options.php">
      <?php
        settings_fields( 'test-settings-group' );
        do_settings_sections( 'test-settings-group' );
      ?>
      <table class="form-table">
        <?php
          echo_my_test_option_item();
        ?>
      </table>
      <?php submit_button(); ?>
    </form>
  </div>
<?php
}
function echo_my_test_option_item() {

  $item = array_replace_recursive(
      array( 'item1' => '' , 'item2' => '' ) ,
      get_option('my_test_item',array()));

  $item1 = esc_attr($item['item1']);
  $item2 = esc_attr($item['item2']);
?>
  <tr><th scope="row" >項目1</th><td><input type="text" name="my_test_item[item1]" value="<?= $item1 ?>"></td></tr>
  <tr><th scope="row" >項目2</th><td><input type="text" name="my_test_item[item2]" value="<?= $item2 ?>"></td></tr>
<?php
}
チェックボックスバージョンの方法1
複数のチェックボックスをまとめるの方法1の動作確認で作成したコードです。
前半は省略しています。連想配列にまとめて登録するバージョンと同じです。
function echo_my_test_option_item() {

  $item = array_replace_recursive(
      array( 'item1' => '' , 'item2' => '' ,'check'=>array()) ,
      get_option('my_test_item',array()));

  $item1 = esc_attr($item['item1']);
  $item2 = esc_attr($item['item2']);
?>
  <tr><th scope="row" >項目1</th><td><input type="text" name="my_test_item[item1]" value="<?= $item1 ?>"></td></tr>
  <tr><th scope="row" >項目2</th><td><input type="text" name="my_test_item[item2]" value="<?= $item2 ?>"></td></tr>
  <tr><th scope="row" >項目3</th><td>
<?php
  echo_my_test_option_checkbox( $item['check'] );
?>
  </td></tr>
<?php
}
function echo_my_test_option_checkbox($data) {
  $checkdata = array(
    array( 'value' => 'red' , 'title' => '赤' ),
    array( 'value' => 'blue' , 'title' => '青' ),
    array( 'value' => 'yellow' , 'title' => '黄' )
  );
  foreach( $checkdata as $value ){
    $checked = isset($data[$value['value']]) ? 'checked' : '';
?>
    <p><input type="checkbox" name="my_test_item[check][<?= $value['value'] ?>]" value="1" <?= $checked ?> ><?= $value['title'] ?></p>
<?php
  }
}
チェックボックスバージョンの方法2
複数のチェックボックスをまとめるの方法2の動作確認で作成したコードです。
チェックボックスバージョンの方法1のecho_my_test_option_checkbox()のみ変更されています。
function echo_my_test_option_checkbox($data) {
  $checkdata = array(
    array( 'value' => 'red' , 'title' => '赤' ),
    array( 'value' => 'blue' , 'title' => '青' ),
    array( 'value' => 'yellow' , 'title' => '黄' )
  );
  foreach( $checkdata as $value ){
    $checked = in_array($value['value'],$data) ? 'checked' : '';
?>
    <p><input type="checkbox" name="my_test_item[check][]" value="<?= $value['value'] ?>" <?= $checked ?> ><?= $value['title'] ?></p>
<?php
  }
}
更新日:2024/02/27
関連記事
スポンサーリンク
記事の内容について

こんにちはけーちゃんです。
説明するのって難しいですね。
「なんか言ってることおかしくない?」
たぶん、こんなご意見あると思います。
裏付けを取りながら記事を作成していますが、僕の勘違いだったり、そもそも情報源の内容が間違えていたりで、正確でないことが多いと思います。
そんなときは、ご意見もらえたら嬉しいです。
掲載コードについては事前に動作確認をしていますが、貼り付け後に体裁を整えるなどをした結果動作しないものになっていることがあります。
生暖かい視線でスルーするか、ご指摘ください。
ご意見、ご指摘はこちら。
https://note.affi-sapo-sv.com/info.php
このサイトは、リンクフリーです。大歓迎です。


